Sunday, September 29, 2013

Polenta Chips and Julie's Eton Mess....

What a weekend it has been.

Three whole days off and Mr B and I have been surprisingly productive. Friday resulted in running some errands, weeding the garden and dusting the house. If you know me you will be well aware that I am not a gardener or a cleaner so for me to achieve both of those things in one day is beyond huge.

On Saturday Mr B and I had a lovely lazy morning and just as we headed out the door for the afternoon we managed to lock ourselves out of the house....

'But wait....' I said.....

 'All is not lost, we have spare keys' I said.....

And then Mr B proceeded to tell me that our spare keys were actually inside, safely tucked away in a drawer. Super useful huh?

So we proceeded to break into our own home. In record time I might add which was slightly scary. But a few window removals and one blaring alarm later we had our keys and were on our way.

Mr B spent the afternoon at an AFL Grand Final BBQ with his friends and I spent the afternoon with my Nan. It has been far too long since I've seen her and at the same time it was like I had only seen her yesterday. We spent hours and hours drinking tea, looking through photo albums and just catching up and I am so glad I finally made the effort.

And today has been a kitchen day - I made crepes and I am not ashamed to say I danced around the kitchen with joy when they worked out.

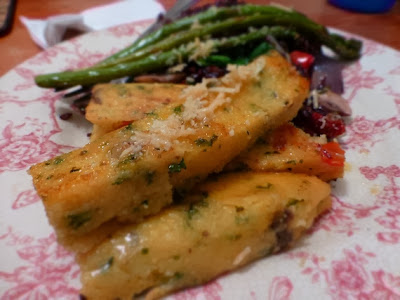
Now onto recipes. Last Tuesday night Mum and Dad served up a stellar menu of Polenta Chips with Black Rice and Asparagus followed by Eton Mess....the main was delicious and comforting, the dessert was light and decadent and it was all shared with 3 of my favourite people - what more could you ask for?


Polenta Chips - Serves 4

1.5 cups chicken stock
1 cup instant polenta
280g jar char-grilled antipasto vegetables, drained and finely chopped
1/3 cup parmesan

Grease and line the base and sides of a 20cm square pan.

Combine two cups of water and stock in a medium saucepan over moderate heat and bring to a simmer.

Slowly whisk in the polenta in a thin steady stream until combined. Whisk and cook for 5 minutes or until polenta is thick and comes away from the sides of the pan. Stir in the vegetable and parmesan. Season with salt and pepper. Spoon into the prepared pan and level the surface. Cover with plastic wrap and chill overnight.

Remove the polenta from the pan and cut in half. Cut each half into 6 pieces. Heat 1 tbspn oil in a fry pan over medium high heat. Add the polenta chips, cooking for 2 mins on each side or until golden.

We had ours with steamed asparagus and black rice, but you could serve these with pretty much anything - or even have them on their own for an afternoon snack!


And what fabulous meal would be complete without a fabulous dessert?

A few weeks ago Mum and Dad made a Strawberry Eton Mess for dessert which was delicious but Mum wasn't 100% thrilled with it and had some ideas to make it bigger and better.The end result was a cross between a trifle and an eton mess and I have to say it was spectacular!


Julie's Eton Mess 

1 pkt Raspberry Jelly Crystals prepared as directed
100g Mini Vanilla Meringues
600ml Thickened Cream, whipped
500g fresh raspberries
White Chocolate and Ice Cream to serve

Break up the jelly and spoon into the bottom of your trifle bowl.

Top with mini vanilla meringues, half of the cream and half of the raspberries.

Repeat layers with the remaining cream and raspberries and finish the whole thing off with some shaved white chocolate.

Serve with some vanilla ice cream and enjoy!!


As you can see from the way he is scraping the leftovers out of the serving bowl Mr B was absolutely NOT a fan...


And last but not least a look at some of the beautiful tulips that have popped up in our front garden this week.

I will never forget walking out the front door last year to find one of our lambs in the garden and when I called out to her Blossom whipped her little head around to show me a mouth full of newly bloomed tulips! It was hilarious but sadly the end of our tulips for that year.

Luckily this year the lambs are in the back paddock so we can enjoy the beautiful colour for a little longer.


Mrs B xx

Wednesday, September 25, 2013

Cinnamon Blondies

Last weekend I learnt a lesson.

Actually I learnt two lessons....possibly even three.

You see normally I ask Mr B what he thinks of the slice / cupcake / biscuit / random creation I'm going to make for his lunches and regardless of whether he says yes or no....I kinda tend to make it anyway.

95% of the time it works out really well and despite his original protests, he ends up enjoying the finished product....

....which means that the remaining 5% of the time Mr B protests for one reason or another, I make it anyway and for the aforementioned reason Mr B refuses to touch it with a ten foot pole....

And for some reason I get all offended and upset that he won't eat whatever it is that I have slaved over even though he made it very clear he wouldn't like it.

Lesson number 1 - Pay more attention to your husband. If he says he doesn't want a Wagon Wheel Slice then he doesn't want a Wagon Wheel Slice.....

Thank god my Dad loves EVERYTHING I make and is always happy to accept donations of misguided baked goods. .


Anyway so basically on Saturday I spent the day in the kitchen, making cheese, baking slices and re-baking slices.

On Saturday afternoon Mr B and I had planned to go down to the wharf and see all of the Tall Ships that were currently docked there, but by the time we managed to head down there it was a bit later then we had planned and I was absolutely exhausted and generally thinking we should just give it a miss, but we had both been looking forward to it so much so I persevered....even when it started to rain.


And do you know what?

The rain cleared up and we had the loveliest time.

Lesson Number 2 - Don't be a sad sack. Make the most of every single second.


Mr B and I spent the afternoon (and well into the evening) wandering around the wharf, jumping on and off the various tall ships and exploring all they had to offer.


There were so many beautiful ships and being able to go on board and have a look at them was a real treat.


Mr B even found his next vehicle!


And when we boarded the last ship, Mr B simply couldn't pass up the opportunity to climb the mast.


Mr B was all kitted up with a harness and was soon making his way up the rope ladder to the crow's nest.

I decided to remain on the ground for 'photography' purposes.


Safe and sound at the top and taking a moment to enjoy the view.


Can you spot him?!


This was the second slice I made on Saturday afternoon after we decided that the Wagon Wheel Slice was going to live with Dad.....

I was super impressed with how dense and chewy these came out and love the more-ish cinnamon flavour!

Cinnamon Blondies

1 1/4 cups plain flour
1 tablespoon cinnamon
115g butter
1 cup caster sugar
1/4 cup brown sugar, packed
1 large egg + 1 large egg yolk, at room temperature
2 teaspoons vanilla extract

Preheat oven to 170C and line a 8x8 inch slice tin with baking paper.

Place the butter, brown sugar and caster sugar into a microwave safe jug and heat in 40 second bursts until butter is melted.

Using an electric mixer, combine the butter mixture with the flour, cinnamon and vanilla. Add the egg and egg yolk and beat until combined. The mixture will be very thick.

Spread mixture into your prepared pan and bake for 30-35 mins or until golden around the edges and set. Allow the blondies to cool completely before removing from the pan.

If you wanted to you could top the cooled blondies with a vanilla buttercream but Mr B wasn't interested in that and given my track record for ignoring his requests and it backfiring on me, I thought I better actually listen this time. However in saying that, they were delicious just as they were.


And do you know what - my Dad sent me a txt message this morning saying that he loved the Wagon Wheel Slice and that he gave some to his workmates to try and they loved it too......as it turns out it wasn't a failure, it was a success.

Lesson Number 3 - Always get a second (or third!) opinion and never delete your awesome photos assuming the recipe isn't good enough for the blog prior to gaining said second opinion....

Enjoy!

Mrs B xx

Sunday, September 22, 2013

Neapolitan Icecream and Nutella Crunch Cake

It struck me a few weeks ago that it has actually been quite some time since I made dessert for just Mr B and I. 

Each Monday night I used to make us something to satisfy our post dinner sweet tooth and given there is only two of us it would normally last the whole week, but lately between one thing or another, dessert just seems to have fallen by the way side and the best we have managed is a tub of ice cream. 

The only problem with that is we have no portion control with ice cream and a 1 litre tub lasts us all of two nights.....

Anyway, last week Mr B finally cottoned on to this whole lack of a real dessert caper so I thought I better get my act together. 

It still involved a tub of ice cream mind you, but I took it to a whole other level by adding loads of crunchy Nutella pieces. 

We were both slightly unsure about this dessert to start with because we were worried the rice bubbles would go all soft and chewy, to our surprise they actually stayed nice and crunchy and it turned out to be a real winner!


Neapolitan Icecream and Nutella Crunch Cake
 
2 cups Nutella
6 cups puffed rice cereal like Rice Bubbles
4 litres neapolitan ice cream

Place a large springform tin and a very large mixing bowl in the freezer to chill. 

In a microwave safe bowl, heat the nutella for 30 seconds or until softened. Working quickly, combine the nutella with the rice cereal. Mix well so that all of the cereal is coated in the nutella. 

Line a baking tray with grease proof paper and pour over the nutella mixture. Spread evenly over the pan and smooth the surface. Place in the freezer. 

Remove the ice cream from the freezer and place in the refrigerator to soften. 

After about 30-45 minutes your nutella mixture should be chilled and firm but not frozen. Cut the mixture into bite sized pieces and if necessary place back into the freezer until the ice cream has softened. You want the ice cream to be soft enough to easily and quickly stir the nutella mixture through without breaking it up too much but not melted to the point where it's runny. 

Remove the bowl and springform pan from the freezer. Combine the chocolate and vanilla portion of your neapolitan ice cream and the nutella mixture in the large bowl

Spoon the mixture into your springform pan, pressing it down firmly to ensure there are no air pockets. Top the cake with the reserved strawberry ice cream. 

Cover the tin with plastic wrap and place in the freezer for overnight. 

This cake is massive so if you are serving the whole thing at once I would suggest removing it from the freezer about 30-45 minutes before serving and placing in the refrigerator to soften a bit. If however you decide that rather then sharing it you will savour a slice every night for as long as possible I would suggest cutting your desired portion and letting it sit at room temperature for maybe 5 mins before you tackle it. 


Enjoy!

Mrs B xx

Wednesday, September 18, 2013

Port Wine and Lemon Flummery


Is there anything better then a light fluffy dessert with all the decadence of a mousse, but with next to none of the fuss?? 

I didn't think so. 

Last Tuesday night Mum and Dad served up this very specky looking flummery for dessert using one of my Nan's recipes and it was down right delicious. 

I mean once you taste it you will be sold but once you realise how easy it is to make....well you will be absolutely hooked. 

Plus I mean you can use any flavour of jelly crystals you want and if your going to make the big double stack like the one in these photos, there are a ridiculous number of flavour combinations available to you. 


Jelly Flummery

2 x 375ml tins of full fat evaporated milk
1/2 cup caster sugar
2 pkts different flavoured jelly crystals (we used Port Wine and Lemon)
2 cups boiling water

Mix 1 packet of jelly crystals with 1 cup of boiling water. Stir to dissolve and set aside to cool completely.

Using an electric mixer, whip 1 tin of the evaporated milk until thick. Add half of the sugar and beat until dissolved.

Add the cooled jelly and beat until combined. Pour the mixture into your serving dish to set.

Now whilst the bottom layer is setting, repeat the above steps with your  remaining ingredients and gently pour over the now semi-set bottom layer.

Place in the fridge overnight to set.

Serve topped with whipped cream and shaved chocolate.


Enjoy!

Mrs B xx

Friday, September 13, 2013

Raspberries and Cream Coconut Bars


A few weeks ago when I asked Mr B what he thought about this slice I wanted to make I clearly heard him say 'Yes dear, that looks lovely and I would be delighted to try it!'

In reality what he actually said was 'Um, nah I don't think so......'

Funny that.

So like all good wives I completely ignored him and made it anyway.

I have been wanting to make this recipe for a very long time now and never seemed to have all of the ingredients in the cupboard when I needed them and on this particular occasion the stars had finally aligned so I wasn't going to let a minor detail like Mr B not actually wanting to try the slice get in my way.

And just like all good wives, it turns out, I was right. Whilst I was cutting the slice up I delicately shoved a piece in Mr B's mouth and somewhere in there he did say it was down right awesome.....

Ok in reality what he actually said was 'it's pretty good' but seeing as he didn't spit it across the kitchen like the horrible tahini and honey slice incident earlier in the year I'm chalking it up as a win.


Raspberries and Cream Coconut Bars

125g butter
2/3 cup caster sugar plus 1/2 cup extra for the filling
1/3 cup dessicated coconut plus 3/4 cup extra for the filling
1.25 cups plain flour
300g frozen raspberries
4 eggs
1/3 cup self raising flour
300ml thickened cream

Preheat oven to 180C / 160C fan-forced.

Grease and line a slice tin with baking paper.

Using an electric mixer, beat butter and 2/3 cup caster sugar until light and fluffy.

Stir in 1/3 cup coconut and plain flour. Use your hands to bring the mixture together to form a soft dough. Press the mixture into the base of your prepared pan and bake for 15 mins or until lightly browned. Allow to cool.

Sprinkle frozen raspberries over the cooled base.

Whisk eggs and extra caster sugar until combined. Add self raising flour, extra coconut and cream. Mix until combined.

Pour mixture over raspberries and bake for 35-40 mins or until golden brown and set. This may take a little longer depending on your oven.

Cool completely in pan before removing and cutting into squares.

Enjoy!

Mrs B xx

Wednesday, September 11, 2013

Twice-Baked Gruyere Cheese Souffles

I was all set to tell you about a Raspberries and Cream slice I made over the weekend today, but then last night Mum and Dad made these Twice-Baked Gruyere Cheese Souffles and they were so good that I just couldn't wait to tell you about them!

I appear to have temporarily mis-placed my sweet tooth and these light and cheesey souffles, which by the way absolutely melted in your mouth, were just what the Doctor ordered. I loved the addition of the chives to the souffles and when you serve them up with some buttery steamed asparagus and baked mushrooms you have a guaranteed winner that will leave people begging for more.

Plus I'm all for anything involving gruyere cheese....

I mean just take a look at them will you?


Now I know it might seem like they are quite time consuming to make given they have to sit in the fridge overnight, but trust me, they are worth every single second of it.

Twice-Baked Gruyere Cheese Souffles - Serves 6

Melted butter, for greasing
50g butter chopped
3/4 cup plain flour
1 1/3 cups milk
150g Gruyere cheese
4 eggs, seperated
1 tbspn finely chopped chives
1/4 tspn sea-salt flakes
6 tbspn thickened cream
Extra 20g Gruyere cheese, grated to serve
Extra chives to serve
Steamed asparagus to serve.

Grease 6 x 1 cup capacity ramekins with melted butter and line bases with baking paper. Arrange in a large deep roasting pan leaving a 2cm gap between each one. Set aside

Melt extra butter in a small saucepan over medium heat and add flour. Stir until combined. (This is a dry mix)

Add milk, 1/4 cup at a time, whisking constantly until completely incorporated. Cook mixture for a further 30 seconds or until smooth and combined.

Add gruyere and stir with a wooden spoon until smooth.

Remove pan from heat and add egg yolks and chives. Stir until smooth and combined. Sit aside to cool for 15 mins.

Meanwhile, pre-heat the oven to 180C.

Place egg whites and salt in the bowl of an electric mixer and beat for 5 mins or until soft peaks form. In two batches, gently fold the egg white mixture into cooled cheese mixture until smooth and combined.

Divide mixture between prepared ramekins. Pour enough water into roasting tin to reach half way up the sides of the ramekins. Bake for 20 mins or until golden.

Remove tin from oven and set aside to cool.

Line an oven tray with baking paper. When the ramekins are cool enough to handle, carefully turn souffles out onto tray, loosely cover with plastic wrap and refrigerate overnight.

Pre-heat oven to 180C.

Spoon 1tbspn cream over each souffle and scatter over extra gruyere. Bake for 20-25 mins or until puffed and golden. Divide souffles amongst serving plates and sprinkle over extra chives. Serve immediately.

Enjoy!

Mrs B xx

Monday, September 9, 2013

Another Year....

Well there was no denying or avoiding it, yesterday was my birthday - honestly it seems to come around far too quickly because I feel like I say that alot, but in all honesty, I don't mind because I know I'm going to get to spend the entire day with Mr B and my Mum and Dad and, to me, that is the best gift of all.


 Yesterday morning Mr B and I had the opportunity for a bit of a sleep in seeing as we weren't due at Mum and Dad's for breakfast until 10am, although that didn't stop me being awake at 7am poking Mr B in the ribs whispering 'It's my birthday!!' until he woke up.....

I was lucky enough to get an early birthday present from Mum and Dad a few days ago which solved all my wardrobe dilemnas because they had brought me this super gorgeous retro dress to wear yesterday - I love Love LOVE it and felt like some sort of vintage princess all day in it.


After a quick photo shoot, Mr B and I headed to Mum and Dad's for breakfast. I'm sure Mr B was holding out hope for eggs and bacon, but Mum and Dad know me well and dished up this beautiful Poached Spiced Dried Fruit with Spiced Honey Yoghurt - it was absolutely divine and I could easily have eaten bowl after bowl of it....except Mr B polished off the leftovers before anyone else got a look in!


Poached Spiced Dried Fruit with Spiced Honey Yoghurt - Serves 4
1/2 cup brown sugar
1.5 cups water
grated rind of 1 lemon
2 cinnamon sticks
1 vanilla bean - split lengthways and scraped
400g dried fruit (apricots, apples, pears and dates)

Combine sugar, water, lemon rind, cinnamon sticks, vanilla bean and scrapings in a saucepan over medium high heat and bring to the boil. Boil for 3 mins.

Add the dried fruit. Cover. Reduce heat to low and cook for 45 mins, stirring occasionally or until fruit is plump and tender. Serve fruit warm with syrup and yoghurt.

To make the yoghurt, combine 500ml thick greek yoghurt with 1-2 tspns of honey and cinnamon to taste.


After breakfast we headed into town for a spot of window shopping. Earlier this year a Peter Alexander shop finally opened up in Hobart and I have been dying to go in for a browse. I have never actually brought myself any Peter Alexander pyjamas because I have issues spending more then $10 on anything I'm going to just lounge around in and most likely spill my dinner on before I go to sleep, but that doesn't mean I don't love looking at them!

Mum and I browsed in and out of every sale rack we could find and if it all got too girly and lingerie related, Mr B and Dad hung around outside the store trying their best not to look suspicious....

I felt bad for them loitering around out there so told Mum to go and get them.....but when they came into the store they didn't like anything I tried on so they were quickly sent back outside!

As it turns out the sale racks had to wait because unbeknownst to me, we had a lunch date!


As soon as we drove down into Salamanca Place I started thinking 'please let us be going to Jack Greene's, please let us be going to Jack Greene's.....' 

And we did! Yay!!! It was right on 1pm rush hour though so we were informed it was a 50 minute wait for food but we managed to survive that by playing musical tables around the restaurant. The third table we tried was not too breezy, not too small, just right and just in time for our meals to arrive!!


Mr B ordered his beloved mini burgers. Last time we were here we discovered that they have a sample plate where you can pick any 3 mini burgers so I think this time Mr B decided to try the blue swimmer crab, the wagyu beef and the duck - of course he said they were all awesome, but I just love them because they are so tiny and adorable!!


Mum ordered a vegetarian burger with balsamic mushrooms, grilled halloumi and eggplant relish which looked delicious and had a piece of halloumi the size of my head in it - I'm so having that next time we go!! Dad had a battered fish burger, I had the lamb and halloumi koftas with grilled flat bread and we all shared some chips and onion rings.....next time we go I'm also getting a bowl of the chips and onion rings just for myself, no sharing, they are that good and whatever they were seasoned with is pure gold.


Bellies full, it was time to head home for a nap presents.

I got absolutely spoilt by Mum and Dad with some beautiful new jewellery, including a pink pearl necklace and tree of life pendant, and some pretty new scarves to add to my growing collection! 


I also got this handy dandy lingerie travel case.....I think Mr B likes it a little too much....


And what birthday of mine would be complete without shoes?!

Nearly 3 years ago now, Mr B discovered this giant shoe sculpture in a paddock on his way home from his buck's weekend. Then last year on my birthday, Mum, Dad, Mr B and I stumbled upon the artist's miniature version for sale in a local gallery....and now look at them right here in my lounge room!

Cue lots of squealing and general awe on my behalf. LOVE!!!


Now I think Mr B and my parents conspired on this next part which normally would bother me, but on this occasion I think it worked out very much in my favour so I'm prepared to let it slide!

Mum and Dad brought me a brand new mixer! And whilst my old mixer is only 4 years old, I do use it flat out and it probably feels like it is about 60....

Plus there was that time I put the stainless steel mixer bowl in the microwave to soften some cream cheese...

And that other time I got a spoon wrapped around the beaters....

Ok so it's had a fairly hard life in it's 4 years and is probably due for retirement / downgrading to light duties which it can do now that I have my brand spanking new swish shiny (and did I mention blue??) mixer!


Here is where the conspiring comes in because Mr B brought me this Wilton Decorating Tool Caddy!

Cue more excited squealing and then lots and lots of babbling as I tried to verbalise all the things I could make in my new mixer and then decorate with all my new toys.....so many ideas so little time!!

I have looked at these decorating tool caddys and ooohhh'd and aaahhh'd over all the goodies in them and walked the appliances aisles at the electrical stores day dreaming about a whiz bang new mixer many times, but I never thought I would be lucky enough to own not one, but both of them.


My Mum whipped up some delicious chocolate and vanilla cupcakes, complete with pirate candle at Mr B's insistence, for afternoon tea.

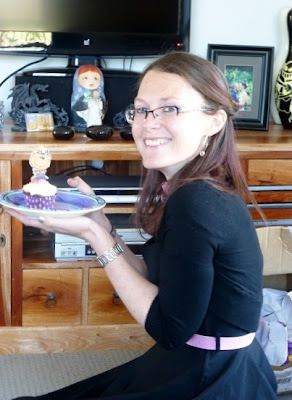
When this photo was taken I had Dad in front of me with his camera, Mr B to the side of me with our camera and there were flashes going off left right and centre, I didn't know which way to look or to smile and was more concerned that my candle had been burning for so long the pirates head was going to melt all over my cupcake!


After Mum and Dad went home, Mr B told me he had to spend some time in the kitchen getting my 'cake' sorted out so I took the opportunity to put some of my presents away, throw on one of my new CD's and put my feet up.

Although I did think it was slightly odd when Mr B asked me if I felt like sweet or savoury and when I said I didn't mind he said he would just do half and half......

About an hour later when Mr B emerged from the kitchen singing Happy Birthday he was carrying this enormous platter full of fresh scones - one was even complete with birthday candle!!

It was only last week on Fathers Day that I complained loudly to Mum, Dad and Mr B about how much I was hanging out for some good fresh scones with jam and cream and how you couldn't find many places that actually had them on the menu anymore. As it turns out, Mr B was listening!

 Half of the scones were plain and half were cheese and it didn't take long for the butter, jam and cream to appear. These were delicious and after a day that seemed to be full of food, a much lighter all-in-one dinner / dessert!


Basic Buttermilk Scones - 2 ways

2 cups self-raising flour
1 tablespoon caster sugar
Pinch of salt
60g butter, chilled, chopped
3/4 cup buttermilk
1/4 cup grated cheese
Extra buttermilk, for brushing
Butter, Strawberry jam and whipped cream, to serve

Preheat oven to 220°C/200°C fan-forced. Line a baking tray with baking paper. Position oven rack in the top half of oven.

Sift flour, sugar and salt into a bowl. Add butter. Using fingertips, rub butter into flour mixture until mixture resembles fine breadcrumbs.

Make a well in centre of mixture. Add buttermilk. Using a flat-bladed knife, stir until a sticky dough forms. Turn out onto a lightly floured surface. Knead gently until just smooth. Divide dough in half.

To one half of the dough mixture, add the cheese and gently work through the dough.

Using a lightly floured rolling pin, gently roll out each portion of dough out until 2cm thick. Using a 6cm round cutter, cut out scones. Press leftover dough together. Repeat to make 12 scones.

Place scones, just touching, on prepared tray, making sure to seperate your plain and savoury ones.

Brush scones with buttermilk and bake for 12 to 15 minutes or until golden and hollow when tapped on top. Serve the plain ones with jam and cream and the savoury ones with butter and if you have cheese and tomato relish floating around, they are pretty good with some of that too!


So there you have it.

That was my birthday.

And I loved every single second of it spent with my amazing family who I would be lost without. Thank you all for just being you xx

Enjoy!!

Mrs B xx

Saturday, September 7, 2013

Chocolate Profiteroles

I love this time of year.

The dreary winter days are slowly replaced by beautiful warm spring sunshine and the gardens and road sides are dotted with bright bursts of colour, my favourite of which would have to be the daffodils.

Don't they just personify spring and all things warm and sunny??


This week based on some recent success stories with recipes I have previously been too scared to try, I decided to tackle the humble profiterole.

Everyone loves profiterole and as a dessert you just can't go wrong with them, plus they are super versatile.

Seeing as this was my first attempt I wanted to stick to the classic cream filled and chocolate topped version. But before I could even think about that, I had to conquer making choux pastry.

I prepared myself for epic failure, I gave myself plenty of time to re-make the mixture when the first one went horribly wrong.....and you know what? It was actually super easy, I'm not really sure what I was so concerned about and now I'm keen to tackle it in it's other forms....chocolate eclairs anyone?!

Basic Choux Pastry

40g butter, chopped and at room temperature
1/3 cup plain flour
1/3 cup water
2 eggs lightly whisked

Place water and butter in a medium saucepan and bring to the boil over high heat. Remove from the heat and add the flour. Stir to combine.

Place flour mixture back over moderate heat and stir for 1-2 mins or until mixture forms a ball and comes away from the sides. Set aside for 5 mins to cool slightly.

Transfer mixture to the bowl of an electric mixer and gradually add eggs, beating well after each addition until you have a smooth glossy paste that holds its shape when you lift the beaters.


Chocolate Profiteroles - Makes 12

1 quantity of basic choux pastry
200g milk chocolate melts
300ml thickened cream
1 tbspn icing sugar
Strawberries to serve

Pre-heat oven to 180C and line a baking tray with baking paper.

Spoon the pastry into a piping bag fitted with a 1.5cm plain nozzle. Pipe 12 balls onto your prepared tray leaving room for spreading. Try to pipe them so that they have some height.

Bake for 20-25 mins or until puffed and golden. Do not open the oven door during the cooking period.

Once the profiteroles are cooked, remove from the oven. Turn the oven off. Using the tip of a sharp knife or a skewer, pierce the base of each profiterole to release the steam. Place back on the tray and in the oven with the door slightly ajar for 10 -15 mins. Remove from the oven.

Did you know that the water in the dough turns to steam during the cooking process which is what causes the profiteroles to puff up and essentially be nice and hollow for filling? Ok so you probably did, but I didn't - I learnt so much whilst making these! Ok back to the cooking now....

Place chocolate, 1/3 cup cream and 1/3 cup water in a bowl and microwave for 30 seconds on high, stir until melted and smooth.

Beat the remaining cream and icing sugar until stiff peaks form. Spoon the mixture into a piping bag fitted with a 1cm nozzle. Using the pierced hole on the base as a guide, fill each profiterole with cream. Serve drizzled with chocolate sauce and fresh strawberries.


I am really happy with the way these these profiteroles turned out. They looked fabulous and tasted divine!

The pastry was gorgeous and light and the explosion of cream when you took your first bite topped with the milk chocolate sauce made for a very special after dinner treat. Oh and the strawberries are for mopping up all the cream and chocolate sauce you've dripped on the plate afterwards!!

Enjoy!

Mrs B xx


Wednesday, September 4, 2013

Zucchini, Cheese and Chorizo Twist


I am ashamed to say that this recipe almost never happened.

It is actually one of the very first recipes I carefully cut out of a magazine, placed in my folder and vowed I would some day make.

But then every time I was flicking through the pages looking for inspiration I just couldn't shake the idea that it looked either difficult or bland and so I passed it over time after time.

Last week I decided to just bite the bullet and try it, if it was no good then at least I knew and if it turned out well then it might encourage me to try some of those other recipes I keep overlooking.

It didn't turn out good.

It turned out super awesome.

I don't know why I thought it might be difficult because it was really quick and easy to throw together and whoever said it looked bland is clearly not thinking straight because between the cheese, the chorizo and the eggs there are so many different flavours going on in this thing it's unbelievable. And so many different things you could do with it too -  next time I'm planning on adding some semi dried tomatoes and fetta to the rice mixture for a mediterranean touch.....but in saying that the original version is pretty damn good and I feel it is going to very hard to beat!


Zucchini, Cheese and Chorizo Twist

3 large zucchini, grated
1 onion, diced
2 tspns crushed garlic
1 cup cooked white rice
1 cup grated cheddar cheese
1/3 cup grated parmesan cheese
1/2 tbspn crushed wet basil
2 sheets shortcrust pastry
100g chorizo slices
3 hard boiled eggs, peeled and halved
Milk

Pre-heat oven to 200C / 180C fan-forced. Grease and line a large baking tray.

In a frying pan over medium high heat, combine the onion and garlic and cook for 2-3 mins or until onion has softened.

Add the zucchini and cook for 3-5 mins, stirring regularly. Drain any excess liquid from the pan.

Combine the rice, cheeses, basil and zucchini mixture and season with salt and pepper.

Place the two sheets of pastry on the prepared tray, overlapping about 4cm. Gently press pastry together to seal.

Arrange the chorizo in the centre of the pastry leaving a 7-8cm border on all sides.

Spread half of the zucchini mixture over the chorizo. Lay the hard-boiled eggs over the zucchini mixture in a line down the centre. Top with the remaining zucchini mixture.

Using a sharp knife, make cuts in the pastry on the long sides surrounding the filling at 2cm intervals.

Start by bringing the ends of the pastry up to enclose the filling and then bring alternating strips up and over to enclose completely.

Brush with a little bit of milk and bake for 30 mins or until golden.


And say hello to delicious-ness!

This was equally good cold - I may have had a nibble straight out of the fridge - so I think it would also make a great addition to a picnic basket!

Enjoy!

Mrs B xx

LinkWithin

Related Posts Plugin for WordPress, Blogger...