Tuesday, September 23, 2014

Break Time

Now I know I have been a little slack with my blog posts lately but despite the whole being on maternity leave thing I seriously just have not had the time.

Sure I could have made the time, but it would have been at the cost of something else and I have really enjoyed the down time, the lazy weekends with Mr B, the long walks in the sun, the who cares if we have spaghetti on toast for dinner again attitude.....

I know it's not going to be easy and my immediate future is filled with sleep deprivation but I can't wait to experience every little bit of it.

There is just so much that I am looking forward to like all those milestones from first smile to first words to first steps, not to mention quality family time and lazy weekends at the park and picnics and pyjama days and pancake Sundays.....

I have thoroughly enjoyed writing every entry of this blog and learning and creating and sharing great meals with even better people. I love seeing our books show up in the mail every year and am proud of the collection of Love, Shoes and Cupcakes cookbooks on my shelf, but the truth is I just don't know how this will work going forward. It might. It might not. It's a massive unknown for me.

So what I'm trying to say is that I am going to take a break for a little while and just enjoy getting to know our little TJ but please know that over the last 4 years I have appreciated every reader and every comment.

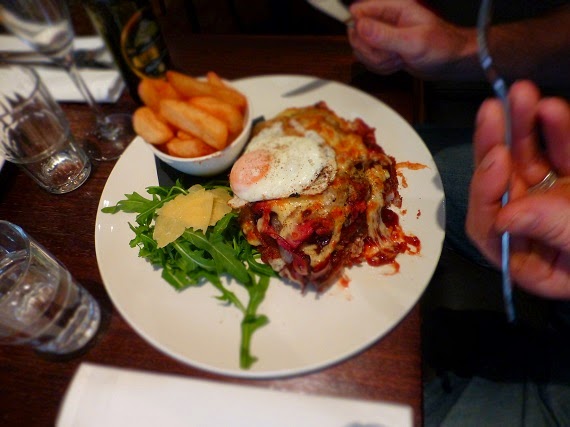
In an effort to go out on a high today I thought I would share with you not one but two meals - both are very basic, but in my opinion they can't be beaten.

Mr B and I were both pretty excited when this Chicken with Lemon and Rosemary dish came together as Mr B is a through and through meat and three veg man and I always had this notion in my head that meat and three veg was...well you know....kind of boring and should be avoided at all costs.

But this dish provided meat and FOUR veg, enough flavour to burst out your eye balls and it was nowhere near boring. Plus when you serve it up followed by the Butterscotch Pudding you have yourself a fully functioning grown up menu sure to please even the fussiest of eaters.


Chicken with Lemon and Rosemary - Serves 2

1 tbspn olive oil
2 x chicken breast fillets
1 heaped tbspn crushed garlic
2 cups chicken stock
Juice and finely grated rind from one lemon
1 tbspn chopped fresh rosemary leaves
1 tspn cornflour
1/4 cup cream
Steamed vegetables to serve

Heat oil in a large frypan over medium high heat and cook the chicken for 4-5 mins each side or until browned all over. Transfer to a plate.

Add the garlic to the pan and cook for 2 mins. Add chicken stock, lemon rind, lemon juice and rosemary. Bring to the boil.

Return the chicken to the pan and reduce heat to low. Simmer uncovered for 10-15 mins or until chicken is just cooked, turning half way through. Transfer chicken back to a plate.

Combine the cornflour with 1 tbspn cold water and add to the pan. Bring to the boil whilst stirring constantly. Once mixture has thickened slightly add the cream and season with salt and pepper. Return chicken to pan and cook for 2-3 mins, turning to coat in the sauce.

Serve chicken drizzled with sauce and steamed vegetables.

In my opinion this Butterscotch Pudding is like a giant golden syrup dumpling, only lighter and in self saucing pudding form.....I apologise for the lack of photos, I've made this several times now and it either disappears too quick or we are just so keen to dig in that all ideas of taking photos go out the window, but trust me you will not be disappointed......except when you realise you've eaten it all and there is none left....

Butterscotch Pudding - Serves 4

1 cup self raising flour
3/4 cup of caster sugar
pinch of salt
60g butter, melted
1/2 cup milk
2 tbspns golden syrup
1.5 cups water
1 tbspn brown sugar
30g butter

Pre-heat oven to 180C and grease a 6 cup capacity oven dish.

Sift sugar, salt and flour into a bowl. Combine melted butter and milk and add to dry ingredients. Stir well to combine. Spoon mixture into prepared oven dish.

Combine the remaining butter, golden syrup, water and brown sugar. Heat on the stove top over low heat or in the microwave until melted and combined.

Pour the sauce mixture over the back of a spoon over the pudding to cover. Bake for 35-40 mins or until cake on top is golden and bounces back when lightly touched. Serve with lots and lots of cream!


As always, enjoy!

Mr and Mrs B xx

Monday, September 22, 2014

Slow Roasted Greek Lamb with Home Made Flat Bread

It is mid-morning on what looks like a gorgeous Spring day outside. 

The sun is shining, the birds are singing.....

.....and I'm sitting in bed in my dressing gown eating a bowl of muesli and yoghurt, drinking my coffee and preparing to tell you about the awesome Slow Roasted Lamb dish we made the other night.

And I'm OK with that. Normally I would be all cranky because I was stuck inside while the sun was shining but at the moment I'm all sorts of tired. We are currently sitting on 37 weeks of baby growing  and smack bang in the middle of all that nesting fun. I am doing my best to take it easy but everywhere I look there just seems to be things to do like oh I must read some of that book before bub arrives and I must dust and vaccuum the house and I must get rid of those cobwebs and paint my nails and read some magazines and pack bags for the hospitals and do a million loads of washing and relax and bake and clean out every cupboard we own and catch up with people for coffee and have a minor melt down somewhere in the middle.....

Sounds fun doesn't it?

So my plan of attack this week is lots of sleep ins, tick 1 or 2 things off my crazy lady to-do list in the afternoons and plonk myself on the couch with said books / magazines / cross stitching early in the evening and not move until bed time.

Totally do-able.

Anyway, we are here to talk about the fact that

a) I cooked slow roasted lamb which was so tender it fell apart as soon as you looked at it;
b) Mr B made his very own flat bread which was soft and bubbly and down right awesome; and
c) the two combined together were blow your mind spectacular (the photos however were a little dark but we were in food heaven and did not have time to care!)


Slow Roasted Greek Lamb with Home Made Flat Bread - Serves 3-4

2 tbspns olive oil
1 red onion, diced
1 tbspn crushed garlic
1/4 cup lemon juice
1/2 tspn cumin
1/4 tspn cinnamon
600g lamb leg steaks (or if you can find a herb and garlic butterflied lamb leg that would work perfectly)
2 tbspns plain flour
2 cups beef stock
3 sprigs fresh thyme
1 lebanese cucumber, cut into ribbons
200g cherry tomatoes, halved
Plain yoghurt and flat bread to serve

Pre-heat oven to 200C.

Place lamb leg steaks into a freezer bag with the plain flour and toss to coat.

Heat 1 tbspn of the oil in a frying pan over medium high heat. Add the lamb and cook for 2-3 mins on each side or until browned all over.

Add stock and thyme and bring to the boil.

Transfer lamb and stock to a large baking dish and cover with foil. Place in the oven for 2 hours, turning lamb over half way through. Once the lamb is cooked it will pretty much fall apart when you poke it - when your lamb is at this stage, remove from the oven and shred with a fork. Most of your stock will have been soaked up during the cooking process, just don't forget to remove those thyme sprigs!

Heat the remaining oil in a fry pan over medium high heat and add the red onion. Cook for 3-4 mins or until it starts to char. Add the garlic, lemon juice, cumin and cinnamon. Cook for 2- mins or until fragrant.

Add the shredded lamb to the fry pan and reduce heat to medium low. Stir occasionally for 5 mins.

Combine the tomatoes and cucumber and season with cracked pepper and lemon juice.

Serve the shredded lamb with flat bread, tomato and cucumber salad and plain yoghurt.


Home Made Flat Bread - Makes 12

1 cup plain yoghurt
1-2 cups self raising flour

Combine yoghurt with 1 cup of flour. Add another 1/4 cup flour until you get a smooth pliable dough. Knead for 5 mins be lazy like me and use your electric mixer with dough hook attachment....

Roll the dough into 12 even sized balls.

Heat a fry pan over medium heat - you want a dry pan so don't add any oils.

Use a rolling pin to roll each dough ball out until it's nice and thin. Place into the fry pan.

Once the bread starts to bubble, turn it over and cook for a further 60 seconds before removing from pan.

Repeat with remaining dough.

How super easy is that!? Plus you could easily halve or quarter the recipe and whip up fresh home made flat bread whilst your favourite curry / flat bread accompanying dish is simmering away on the stove!


Enjoy!

Mrs B xx

Thursday, September 18, 2014

It's Raining Babies!

Ok so it's not really raining babies but I did have my baby shower over the weekend which is kind of like the same thing...


To start with I was not overly fussed with the whole baby shower thing, but I did quite like the idea of having a nice afternoon with the 'girls'......the ladies at work and Mum took that as a green flag and ran with it.


One of my favourite things from the day was the bib decorating station where all the guests got to paint a personalised bib for bub (or Mr B and I on those 'I'm so tired I'm drooling everywhere days which we all know are going to happen!). It was a really lovely idea and some of the designs cracked me up - especially the 'My Dad thinks he's funny' and the 'I'm cute, Mum's cute, Dad's just lucky' ones from Mr B's sisters!


Then there was the 'Guess How Big That Belly Is' game where we learnt that my Mum knows me better than anyone and some of my friends have terrible judgement skills!!


Next came the 'Name That Nappy Filling' game.....

Five nappies were passed around the circle, each one containing a different chocolate bar which was smooshed up to the point where it resembled....well you get the picture. It was hysterical watching people sniff the nappies (and coming out with chocolate covered noses) and taste test the fillings....


Surprisingly, we still had an appetite after that game so it was time for lunch!

The food was incredible, there were asparagus rolls (thanks Mum!), salad sandwiches, fruit platters, bread and dipping oils, lasagne, mini quiches, bruschetta, mud cake, sponge cake, caramel tarts, matchsticks and meringues just to name a small selection....


And last but certainly not least, there were gifts.....my goodness were there gifts.


It was a huge day and I was so ready for a nap by the time I got home!

There is no doubt that we were incredibly spoilt and I can not even begin to explain how thankful Mr B and I are, not only for all the amazing gifts but also just for being surrounded by such fantastic and thoughtful people.


A huge big thank you to everyone who organised the day and came along to celebrate with us (and to my Mum for driving me around!!).

Mrs B xx

Saturday, September 13, 2014

My Birthday 2014

Earlier this week it was my birthday and I was lucky enough to spend it with this handsome devil! 


Mr B took the day off work to spend with me and I'm so glad he did. Do you know that in the entire 7 years we have been together, it has never been just the two of us on my birthday? Normally Mum and Dad have the day off as well and we all spend the day together but this year they weren't able to and whilst it was a little odd, it was also really nice just spending the day with Mr B (and secretly I think he enjoyed getting to plan the day himself!).


After a leisurely sleep in, brekkie in bed and some super awesome gifts (hello cookbooks!!) Mr B whisked me away to our first stop of the day - a massage centre! I was treated to a full hour of pregnancy massage heaven whilst Mr B subjected himself to an hour or deep tissue massage hell. It is now several days later and I believe he has fully recovered possibly even to the point where he is feeling the benefits but he definitely didn't read the fine point that said immediately after a deep tissue massage you will be sore and sorry....the benefits take days to arrive! I was in absolute stitches listening to him recount his experience to me.....(Bad wife sign no. 1 - laughs at husbands misfortune....)


We then went for a walk through town to a) stretch out Mr B's broken body and b) check out one of my favourite stores that I haven't visited for years (and Mr B had never so much as set foot in!) - The Teddy Bear Shop! It's only a little shop but it is jam packed with so many different types of teddy bears, from big to small to just plain giant - I can't wait to go back in there after bub is born and pick out something special for them. 


Next stop was lunch and as it turns out Mr B does listen to my incessant babbling. He took me to a tapas restaurant on the waterfront called The Mill on Morrison that I have been wanting to try for ages and given it was lunch time on a Monday we pretty much had the whole restaurant to ourselves!

Tapas meals are generally quite small so you can order a wide selection from the menu, try heaps of different stuff and still have room for dessert! Plus the meals are brought to the table as they are ready in the kitchen so you just kind of graze your way through.

We treated ourselves to the Mushroom and Thyme Croquettes (demolished before we could take a photo - super yummy though!), the Char-Grilled Calamari with Lemon, the Garlic Popcorn (Oh My God......), the Beef and Bacon Mini-Burger, the Slow Cooked Beef Cheek with Carrot Puree and two Soft Tacos (one with lentils and veggies for me and one with soft shell crab for Mr B) all washed down with a non-alcoholic cocktail.....very civilised huh?!


Ok I lied....we didn't have room for dessert.

But we did have just enough energy to go for a nice long walk in the sun and then go home for a cup of tea....which is kind of like dessert. 

Mr B built us a cosy corner of cushions, bean bags and blankets and we spent the rest of the afternoon curled up watching a movie.


It wasn't easy, mainly because we were so comfy and I couldn't get up off the floor, but eventually we managed to drag ourselves back out the door and over to Mum and Dad's for tea. 


Being the big kid I am, I'm usually more amused by the wrapping paper then what's actually inside it....


And in a throw back to one of the very first birthday cakes my Mum made me, I present to you the Dolly Varden Cake....Panda Style! 


I absolutely LOVE this cake!! You can't go wrong with vanilla ice cream, marshmallows and pandas....not to mention the fact that Mum and Dad made it!


Isn't she gorgeous?? Although she did look a little happier when I pulled her out of her frozen home....not much we could do about the giant skewer in her head though.....


What a huge day! I am so lucky to have such an amazing family and I love that when we are all together we just laugh and laugh until our cheeks hurt, our sides are sore and you get that whole can't breathe thing going on. Times like these make the best days and the best memories. 


Mrs B xx

Tuesday, September 9, 2014

Fathers Day 2014

Over the weekend we celebrated Fathers Day and whilst this is a special occasion each and every single year, this year was extra special because it was Mr B's first Father's Day as a Father-To-Be!


We started the day off with breakfast at Mum and Dad's.....


And what breakfast would be complete without a few presents thrown in for good measure?

I love this Baby Owner's Manual that Mum and Dad found for Mr B - it's for men and whilst it is based on truth it is written like a car manual and it's absolutely hilarious!


I couldn't resist this little suit when I saw it, it's hard to believe that in a few weeks time there will be a little baby in it!


These little baby Puma's were also a must buy as they match Mr B's sneakers....who would have thought such a teeny tiny pair of shoes could generate such a big grin!


After all that excitement, the boys were obviously in need of some rest and relaxation....


But that didn't last long because we had things to do, people to see and lunch to eat!


Mr B and Dad had challenged each other to a parmi standoff so we decided to go to the Brunswick Hotel which had recently been voted as having the No. 1 parmi in Australia which is a super big call and obviously we were pretty keen to find out for ourselves.

I'm not entirely sure the parmi standoff challenge was fair though as Mr B had a double parmi stack and Dad opted for the single version but by all accounts they were pretty damn good!


Mum and I were really excited to try the mushroom parmis - all your favourite parmi toppings, but on a trio of crumbed and fried mushrooms and they were awesome! This one here is Mum's which was topped with gruyere, pesto, spinach and pinenuts.


After lunch we wandered around town and did a spot of shopping before heading home for, yep you guessed it, more presents!


Forever the big kid at heart.....


Happy Fathers Day to the best Dad out there - thank you for helping make me who I am today and for showing me the kind of parent I want to be.


Mrs B xx

Saturday, August 30, 2014

Chicken, Corn and Zucchini Tortilla Pie

I have been meaning to tell you about this Tortilla Pie for quite a few weeks now.

It all started when Mr B suggested having quesadillas for dinner one night.

Great, something easy I thought.

But after what felt like HOURS of trawling through recipes we couldn't make a decision on exactly what we wanted in them.

This seems to be pretty much standard for us at the moment. I think we are suffering information overload and have lost the ability to make a decision about pretty much anything....don't even get me started on how many hours / days we have spent trying to decide on a nappy bag for the baby!

Anyway, eventually we found this recipe for a Chicken, Corn and Zucchini Tortilla Pie which we were both pretty keen on and let's be honest, a tortilla pie is pretty much (give or take some toasting) a stack of quesadillas so we were sold. This tortilla pie is really easy to throw together, packed full of flavour and as an added bonus, it looks pretty specky when you take it out of the tin too!


Chicken, Corn and Zucchini Tortilla Pie - Serves 4

3 tspns olive oil
1 red onion, diced
1 heaped tbspn crushed garlic
2.5 tspn mexican chilli powder
1 tspn ground cumin
500g chicken mince
410g can diced tomatoes (if you can find some that include tomato paste use those or alternatively add 1 tbspn tomato paste)
310g can corn kernels, 
drained
2 zucchini, grated
5 wholegrain tortillas
1 1/4 cups grated cheese
1 cup light sour cream
2 tomatoes, coarsely chopped
2 spring onions, finely chopped
1 tspn lime juice
Salt and Pepper

Preheat oven to 180°C  and grease a 20cm (base measurement) springform tin. Place on a baking tray and set aside.

Heat remaining oil in a large frying pan over medium heat. Cook onion and garlic, stirring, for 3 minutes or until soft.

Add the chilli powder and cumin and cook, stirring, for 1 minute. Add the mince and cook for 4 minutes or until golden. Add the diced tomato and corn and simmer for 4 minutes or until mixture has thickened slightly.

Add the grated zucchini and cook, stirring occasionally, for 3-5 minutes. Season with salt and pepper. Remove the pan from the heat and allow mixture to cool for 5 minutes.

Place 1 tortilla in prepared pan. Spread one-quarter of the mince mixture over the tortilla. Sprinkle with 1/4 cup of the cheese. Repeat layers with remaining tortillas, mince mixture and cheese, finishing with 
1 tortilla. Spread the top with half of the sour cream and sprinkle with remaining cheese. I also sprinkled a little extra chilli powder over the cheese.

Bake for 15 minutes or until cheese is melted. Stand in pan for 10 minutes.

Place tomato, spring onion and lime juice in a bowl and season with cracked pepper. Toss to combine.

Serve tortilla pie with sour cream and tomato salsa

Enjoy!

Mrs B xx

Monday, August 18, 2014

Strawberry and Mascarpone Swiss Roll

This weekend I did something I have not done in a very long time.

I spent the day with my Mum and Dad.

Just the three of us.

Originally we had a day planned for the four of us, but at the last minute Mr B had to go to work. Whilst we were all disappointed that he wouldn't be there, part of me was selfishly pleased to have my Mum and Dad to myself for the day, especially seeing as in a few weeks time chances are that it won't happen again for a very long time.

To start the day off Mum and I had booked in for a bit of pampering. I enjoyed my first pregnancy massage  whilst Mum experienced (and enjoyed!) her first acupuncture session. Meanwhile, Dad waited patiently in the car park......

Luckily my appointment finished early so Dad and I went to suss out a local health food shop and stock up on muesli. I love a good bowl of muesli for breakfast but am fairly fussy on what it has in it so I find the best option is to make my own. Currently my favourite combination is banana chips, raisins, dried cranberries, coconut flakes, almond slivers, wheat flakes and bran straws  - drowned in milk and topped with a big dollop of yoghurt it makes the perfect breakfast (and is also pretty damn good eaten straight from the container....)

By the time Mum was out of her appointment we were all starving and decided to head up to the Mt Nelson Signal Station to enjoy some of their famous lemonade scones, a hot cup of tea, some crispy hash browns and soak up the incredible view. The scones were fresh out of the oven, piping hot and MASSIVE. They were also absolutely amazing with some home made raspberry jam and whipped cream. Now I know you're thinking 'who the hell has scones, tea and hash browns??' but this place also does the crispiest hash browns and we were torn between them and the scones....so we each got our plate of scones with a hash brown on the side and the waitress only looked at us like we were a tiny bit odd.....

With our bellies full we were seriously considering a nap but instead decided to hit the shops. Four hours later we had been to a ridiculous number of shops, I had bath bomb in my hair and up my nose (very long story....), I had shopping bags full of goodies to take home, the three of us attended our first baby shop together and Mum and Dad left with a ridiculously long list of things they just 'had' to buy for bub. We had all achieved things on our to-do lists to the point where we had crossed off things we didn't even know we had to do but the best part was I can't think of a time during the day when we weren't laughing.

By the time Mum and Dad dropped me off at home we were all exhausted and I was super grateful to see Mr B and tell him all about our day, have a hot cup of tea and curl up on the couch for a snooze.

I really could not have asked for a better day with better people.


This recipe is actually from our 4th birthday in July. Each year for our blog birthday cake I try and tackle something new that I haven't done before so when I tried to weasle my way out of making a swiss roll all on my own, Mr B put his foot down and pretty much told me to harden up. Fully understanding that I was not getting out of this easily I decided to bite the bullet. I mean how hard could it be?

I was really worried about the roll cracking when I rolled it up and was very surprised at just how easy it was to do. The finished product was super yummy and visually very specky - no cracks in sight!

Strawberry and Mascarpone Swiss Roll - Serves 6-8

3/4 cup plain flour
1 tspn baking powder
1/2 tspn salt
4 eggs separated, at room temperature
3/4 cup caster sugar
1/2 tspn vanilla essence
250g mascarpone cheese (you can buy or make your own like I did)
2 tbspns icing sugar
1/2 tspn vanilla essence extra
250g strawberries, hulled and cut into quarters
2 tbspns caster sugar
2 tbspns orange juice

Pre-heat oven to 190C and line a 15.5 x 10.5 inch swiss roll pan with baking paper, allowing it to hang over the sides.

Place 2/3 of the strawberries in a blender with 2 tbspns caster sugar and blend well. Transfer to a bowl and add the orange juice and remaining strawberries. Place in the fridge for at least 1/2 an hour, however the flavour definitely gets better the longer you leave them.

In a bowl combine the mascarpone with 2 tbspns icing sugar and 1/2 tspn vanilla essence. Place in the fridge until required.

Sift the plain flour, baking powder and salt into a small bowl and set aside.

Using an electric mixer, beat the 4 egg whites at high speed until soft peaks form - this should take 1-2 minutes. Slowly add in 1/3 cup of the caster sugar and continue to beat at high speed until mixture is glossy and stiff peaks form - this should take about 2-3 minutes but the time will vary depending on the speed of you mixer. Set aside.

Using clean beaters and a clean bowl, beat the egg yolks on high speed until they are thick and lemon yellow in colour - this will take about 5 minutes. Slowly add in 1/2 cup of caster sugar and 1/2 tspn of vanilla essence. Continue beating on high speed until ribbons form on the egg mixture when it drips back into the bowl.

Sprinkle the flour mixture over the egg yolks and gently spoon over the beaten egg whites. Gently fold the mixture until combined and evenly coloured.

Spread batter into prepared pan and level. Bake for 12-15 minutes or until the top springs back when lightly pressed.

While the cake is baking, sprinkle a clean kitchen towel with 1/3 cup icing sugar.

Immediately invert the hot cake onto the kitchen towel and gently remove the baking paper. Cut off any crispy edges and carefully roll up the cake and towel from the short end. (I actually rolled ours from the long end, it doesn't really matter which end you roll from!)

Allow the cake to cool completely then carefully unroll and spread with the mascarpone all the way to the edges. Top with 3/4 of the strawberry sauce, reserving the rest for decorating.

Carefully roll the cake back up as tightly as you can without splitting it. Serve drizzled with the remaining sauce and dusted with icing sugar.


Enjoy!

Mrs B x

Sunday, August 10, 2014

Macarons with Lemon and White Chocolate Ganache Filling

A few weeks ago Mr B and I were sent a packet of passionfruit flavoured macaron mix to try.

Macarons have been on my 'must bake' list for a long time but to be honest I've been avoiding them - for a cute little snack they are very intimidating!

Anyway I thought seeing as we had now been given this mix to try that was as good a place to start as any and on the upside, if something went wrong, we hadn't lost anything.

As anticipated, something went wrong.

I'm not sure what but I don't think I mixed the egg whites and the almond meal enough because I ended up with these lumpy flat horrible little macarons with a very artificial passionfruit flavour.

Now when I said earlier that if they went wrong it would be OK because we hadn't lost anything? Well that's not exactly how it worked out because by now I was hooked. I knew what I had done wrong and damn it I was going to make macarons. So at 6pm on a cold wintery Sunday night I dragged Mr B to the supermarket in search of almond meal - that's right, we were attempting another batch and we were making these babies from scratch.

And do you know what?

Not only did they work out perfectly but they were ah-mazing!

Reason no. 5679 why you should always make things yourself instead of using a packet mix!


Macarons with Lemon and White Chocolate Ganache Filling 

4 large egg whites (or 5 small) 140g
1/3 cup or 70g caster sugar
1 1/2 cups or 230g pure icing sugar
1 cup or 120g almond meal
2g salt (tiny pinch)
gel food colouring (optional)

Preheat the oven to 150C

Place egg whites and caster sugar in a bowl and mix with electric mixer until stiff enough to turn the bowl upside down without it falling out, continue to whip for 1-2 more minutes.  How long this takes will depend on you mixer.  If you are using gel or powdered food colouring add now and continue to mix for a further 20 seconds.

Sift the almond meal, icing sugar and salt twice, discarding any almond lumps that are too big to pass through the sieve. Fold into the egg white mixture. It should take roughly 30-50 folds using a rubber spatula.  The mixture should be smooth and pipeable - not runny. Over-mix and your macarons will be flat and have no foot, under mix and they will not be smooth on top.

Pipe onto trays lined with baking paper, rap trays on the bench firmly (this prevents cracking) and then bake in the oven for 20 minutes. Check if one comes off the tray fairly cleanly, if not bake for a little longer (make sure you are using NON-stick baking paper or they will stick).

Once your macarons have cooled, arrange them into even sized pairs. Top one half of each pair with roughly 1 tspn of your chosen filling and sandwich together. To fill your macarons you can use jam and cream, buttercream, ganache, lemon curd, the possibilities are endless!

Ours kept in an airtight container in the cupboard for 2-3 weeks.

Lemon and White Chocolate Ganache 
1/4 cup thickened cream
150g white chocolate chopped coarsely
1/4 cup lemon juice

Place the cream in a small saucepan over medium heat and gently bring to the boil. Remove from the heat and add the chocolate. Stir until completely smooth.

Add lemon juice to taste (you want to be able to taste the lemon, don’t let the chocolate be overpowering).

Place in the fridge for roughly an hour or until cool and spreadable.

Enjoy!

Mrs B xx

Saturday, August 2, 2014

The Crispiest Chicken Ever!

More often than not I find myself so preoccupied with cooking meals that are new and exciting, I forget about the tried and true classics.

Every now and then Mr B has to remind me that there is nothing wrong with dishing up meat and 3 veg for dinner and I have to say it usually takes me until I'm sitting down enjoying the meal to agree with him.

I don't know why there is such a stigma attached to the humble meat and 3 veg, I mean more often than not it's simple to throw together, requires little preparation and is versatile in terms of allowing you the freedom to change the meat or the vegies to suit a variety of budgets and tastes. I'm sure I say this every time we have it (and then promptly forget!) but I really do need to remember to cook this more often.

Recently, after being told by my Dad that it would result in the 'crispiest chicken ever', Mr B whipped up some chicken schnitzels for dinner, but instead of using our go-to panko breadcrumbs, he used crushed up cornflakes. I have always been a bit hesitant about the whole using crushed up breakfast cereal to coat my dinner side of things, but after trying these schnitzels I am absolutely 100% converted. Not only are these schnitzels oven baked but they really were super crispy and tasty!


Crispy Baked Chicken Schnitzel - Serves 2

2 x large chicken breasts
1/2 cup plain flour
1 egg
1.5 - 2 cups crushed corn flakes
Seasoning of choice (optional - we added a 20g pkt of roast chicken seasoning which was lemon, roast garlic and onion flavoured)

Use the palm of your hand to push your chicken breast out to a nice thin schnitzel. (You can pound it with a meat mallet, but I find this way gives it the end result a better texture).

Combine the cornflakes with the seasoning and place on a plate.

Whisk egg in a small bowl.

Place flour on a plate.

Coat 1 piece of chicken in flour, shaking off the excess. Dip into the egg and then coat in the cornflake mixture. Refrigerate for 20-30 mins.

(Meanwhile, chuck some veggies on the boil )

Place the chicken on a baking tray lined with baking paper and cook for 20-25 mins, turning halfway through or until golden.

Serve with steamed or boiled vegetables and enjoy!

Mrs B xx

Sunday, July 27, 2014

Blueberry Shortcake

As our due date gets closer, conversations at work often turn to baby showers.

Initially I was adamant that a baby shower was not for me, however it soon became apparent that this was a non-negotiable part of being pregnant. Who'd have thought!?

My ideal baby shower is pretty simple really, a relaxing afternoon filled with friends, laughter and a never ending supply of tea....oh and some cake wouldn't go astray either.

This Blueberry Shortcake,which my Mum whipped up for dessert the other night, would be perfect for a girly afternoon tea, high tea, bridal shower, baby shower or anything really! The lemon zest and the blueberries are a match made in heaven and from there you just need a fresh pot of tea, some thick dollop cream, good friends to share it with and you're set!

And the best thing? It's made in the food processor, no melting, no mixing, no multiple bowls, jugs and other random items clogging up your bench (and your sink!) - just the way I like it!


Blueberry Shortcake - Serves 6-8

100g butter, softened
1/3 cup caster sugar
2 lemons, zested
1 cup almond meal
1/4 cup plain flour
1/2 tspn baking powder
2 eggs, lightly beaten
1/2 tspn vanilla extract
1 cup frozen blueberries
Thickened cream to serve

Pre-heat oven to 150C and grease and line a 20cm round cake tin with non-stick baking paper.

Use a food processor to combine the butter, sugar and lemon zest until pale and creamy. Add the almond meal, flour and baking powder and pulse until combined.

Add the eggs and vanilla to the mixture and process until combined. Pour the mixture into your prepared tin and top with the frozen blueberries.

Bake for 30-40 mins or until a skewer inserted into the centre comes out clean. Allow the cake to cook slightly before removing from the tin. Serve warm with a dollop of thick cream.


Enjoy!

Mrs B xx

LinkWithin

Related Posts Plugin for WordPress, Blogger...